Uncategorized

Developing custom nested element with visual composer ultimate wordpress plugin


First, I am in love with this plugin. I would like to highly recommend this for any of ur new WordPress project.
For this tut

“I will assume you already have an idea for developing custom component”.

Visual composer (VC) uses its own layout template and it might not look exactly what you want. So integrating with custom theme can be some time painful. It will look different that what you except. To make it easy VC have awesome feature for creating custom components ( any block in your site ), with this we can implement our own custom components with custom layout template.

Today I am going show you a simple way to create nested element, some thing like a custom grid block as below

outer-inner-box

So here we need

  1. A outer container ( A component that can hold some other component ) [team_wrapper]
  2. An inner component [team_mate ]

Lets think it like a short-code that can hold multiple other short-codes

[team_wrapper ]
   [team_mate name="jumper one"]
   [team_mate name=”jumper two”]
   [team_mate name=”jumper three”]
[/your_gallery]


Step 1 :

Register Team wrapper container Element

gist: https://gist.github.com/neroze/ccea5899de39ece5f6dab3773108ee4d

vc_map( array(
“name” => __(“Team Wrapper”, “my-text-domain”),
“base” => “team_wrapper”,
‘category’ =>__(‘Team’, ‘rhthm’),
“as_parent” => array(‘only’ => ‘team_mate’), // Use only|except attributes to limit child shortcodes (separate multiple values with comma)
“content_element” => true,
“show_settings_on_create” => false,
“is_container” => true,
“js_view” => ‘VcColumnView’
) );

Step 1.1

Register short code

gist: https://gist.github.com/neroze/22c71ff63efa7e7bf0348de1c1fc4dfa

function team_wrapper_block_function( $atts, $content ) {
extract( shortcode_atts( array(
‘el_class’ => ”
), $atts ) );
ob_start();
echo ‘<section class=”team-wrapper”>
‘.do_shortcode($content).’
</div>
</div>
</section>’;
$content = ob_get_contents();
ob_get_clean();
return $content;
}
 add_shortcode( ‘team_wrapper’, ‘team_wrapper_block_function’ ) ;

Step 2 :

Register Team Block Element

gist: https://gist.github.com/neroze/3e887d5c39ce614a0766ee1a31dfa0a5

vc_map( array(
“name” => __(“Team Mate”, “rhthm”),
“base” => “team_mate”,
‘category’ =>__(‘Team’, ‘rhthm’),
“content_element” => true,
“as_child” => array(‘only’ => ‘team_wrapper’), // Use only|except attributes to limit parent (separate multiple values with comma)
“params” => array(
// add params same as with any other content element
array(
“type” => “textfield”,
“heading” => __(“Name”, “rhthm”),
“param_name” => “name”,
“description” => __(“Name”, “rhthm”),
‘holder’ => ‘div’,
‘class’ => ‘text-class’,
),
array(
“type” => “textfield”,
“heading” => __(“Status”, “rhthm”),
“param_name” => “status”,
“description” => __(“Status”, “rhthm”),
‘holder’ => ‘div’,
‘class’ => ‘text-class’,
)
,array(
“type” => “attach_image”,
“heading” => __(“Profile Image”, “rhthm”),
“param_name” => “profile_image”,
“description” => __(“Profile Image”, “rhthm”)
)
,array(
“type” => “textarea”,
“heading” => __(“Description”, “rhthm”),
“param_name” => “description”,
“description” => __(“Description”, “rhthm”)
)
)
) );

step 2.2

gist: https://gist.github.com/neroze/cd2fc7c36ff740362feb72b57fa35032

function team_mate_block_function( $atts, $content ) {
extract( shortcode_atts( array(
‘name’ => ”,
‘status’ => ”,
‘profile_image’ => ”,
‘description’ => ”
), $atts ) );
ob_start();
?>
” alt=””>
<p><?php echo $description; ?></p>
</div>
</div>
</div>
<?php
$content = ob_get_contents();
ob_get_clean();
return $content;
}
add_shortcode( ‘team_mate’, ‘team_mate_block_function’ );


Final step :

We need extend two VC classes

Note: Be care full here name of the class should match the same of “base” parameter that we have used to register VC Element

gist: https://gist.github.com/neroze/99019f1696a45be385e53665f0fd7910

if ( class_exists( ‘WPBakeryShortCodesContainer’ ) ) {
class WPBakeryShortCode_Team_Wrapper extends WPBakeryShortCodesContainer {
}
}
if ( class_exists( ‘WPBakeryShortCode’ ) ) {
class WPBakeryShortCode_Team_Mate extends WPBakeryShortCode {
}
}

And you are all done. It will be available as new VC elements
1. Add team wrapper
2.Team Mate as many as you like

Cheers

laravel, php, Uncategorized

Custom Facades in Laravel 4.2.X


// file System

Untitled


Name of Custom Facade "Sky"

steps:

1. create a new folder facades inside app folder

2. create a new folder same name as of your custom facade name. [ eg: app/facades/Sky / ]

3 create one more folder inside app / [ your facade folder ] / Facade

4. now create 2 files in the your facade base

app/facades/Sky/
              / Helper.php
              / HelperServiceProvider.php

5. a facade class inside a
app/facades/Sky/Facade/
                     /Helper.php

=============== Contents inside files =================
## app/facades/Sky/Helper.php

namespace Sky;
Class Helper {

	public function fire()
	{
		return 'Fireing ... ';
	}

	public function boom()
	{
		return 'Fireing boom... ';
	}
}

## app/facades/Sky/HelperServiceProvider.php

namespace Sky;
use Illuminate\Support\ServiceProvider;

class HelperServiceProvider extends ServiceProvider {


    public function register()
    {
        // Registering 'helper class'
        $this->app['helper'] = $this->app->share(function($app)
        {
            return new Sky\Helper;
        });

        // dynamic creating Alias, so that you do not have to add an Alias in app/config/app.php
        $this->app->booting(function()
        {
            $loader = \Illuminate\Foundation\AliasLoader::getInstance();
            $loader->alias('SkyHelper', 'Sky\Facade\Helper');
        });
    }

}
?>
## app/facades/Sky/Facade/Helper.php

namespace Sky\Facade;

use Illuminate\Support\Facades\Facade;

class Helper extends Facade {

    /**
     * Get the registered name of the component.
     *
     * @return string
     */
    protected static function getFacadeAccessor() { return 'Sky\Helper'; }

}

### this is it all you need for your custom facades ##########

### one more last thing you need to do for autoload the facade classes ####
# GO to composer.json, add new line app/facades for autoloading.

"autoload": {
		"classmap": [
			"app/commands",
			"app/controllers",
			"app/models",
			"app/database/migrations",
			"app/database/seeds",
			"app/facades",
			"app/tests/TestCase.php"
		]
	},

finally RUN " composer dump-autoload "

Cheers enjoy
wordpress

Access WordPress inbuilt filemanager for custom plugins


## HTML

<a href="#" class="custom_media_upload">Upload</a>
<img class="custom_media_image" src="" />
<input class="custom_media_url" type="text" name="attachment_url" value="">
<input class="custom_media_id" type="text" name="attachment_id" value="">

## PHP

if(function_exists( 'wp_enqueue_media' )){
wp_enqueue_media();
}

## JS

jQuery(document).ready(function($) {


var custom_uploader;
jQuery('.custom_media_upload').click(function(e) {

e.preventDefault();

custom_uploader = wp.media({
      title: 'Custom Title',
      button: {
      text: 'Custom Button Text'
  },
  multiple: true // Set this to true to allow multiple files to be selected
})
.on('select', function(el, bl) {

   var attachment = custom_uploader.state().get('selection').first().toJSON();
   console.log(custom_uploader.state());

   $('.custom_media_image').attr('src', attachment.url);
   $('.custom_media_url').val(attachment.url);
   $('.custom_media_id').val(attachment.id);
})
.open();
return false;
});
});
laravel

Removing /public/ folder from Laravel


As inspired by CI ,

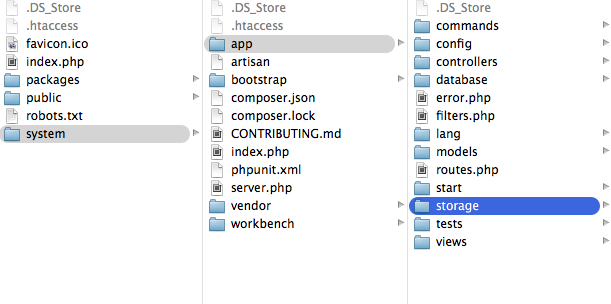
1. Create a “system” folder in root.

2. Move all the files to system except the public folder.

3. Move all the files form public to root folder.

It should now looking something like attached screen shot below.

Screen Shot 2014-08-22 at 1.21.11 PM


4. Reconfigure the paths

 laravelfiles/bootstrap/paths.php

'app' => __DIR__.'/../app',
'public' => __DIR__.'/../public',

Change these two lines to:

'app' => __DIR__.'/../app',
'public' => __DIR__.'/../../',

Find these lines in index.php

require __DIR__.'/../bootstrap/autoload.php';
$app = require_once __DIR__.'/../bootstrap/start.php';

And change to:

require__DIR__.'/system/bootstrap/autoload.php';
$app= require_once__DIR__.'/system/bootstrap/start.php';


Now time to remove index.php form url 

<IfModule mod_rewrite.c>
Options -MultiViews
RewriteEngine On

RewriteCond %{REQUEST_FILENAME} !-d
RewriteCond %{REQUEST_FILENAME} !-f
RewriteRule ^ index.php [L]
</IfModule>


Cheers enjoy.

codeigniter, JavaScript, jquery

Integrating Elfinder and ckeditor


1. In view file

// link the required js and css

<script src=”<?php echo assets_url( ‘admin/lib/jquery-1.7.2.min.js’ );?>” type=”text/javascript”></script>
<script type=”text/javascript” src=”http://ajax.googleapis.com/ajax/libs/jqueryui/1.8.18/jquery-ui.min.js”></script&gt;
<link rel=”stylesheet” type=”text/css” media=”screen” href=”<?php echo assets_url( ‘js/plugins/elfinder/css/elfinder.min.css’ );?>”>
<link rel=”stylesheet” type=”text/css” media=”screen” href=”<?php echo assets_url( ‘js/plugins/elfinder/css/theme.css’ );?>”>

<script src=”<?php echo assets_url( ‘js/plugins/ckeditor/ckeditor.js’ );?>”></script>
<script src=”<?php echo assets_url( ‘js/plugins/ckeditor/adapters/jquery.js’ );?>”></script>
<script src=”<?php echo assets_url( “js/plugins/elfinder/js/elfinder.min.js” ) ?>”></script>

2. initialize the elfinder

<script type=”text/javascript”>
    $(document).ready(function(){
 // setting base url for javascript [ using codeigniter ]
 var base_url = ‘<?php echo base_url(); ?>’;
// new config for ckeditor dialog box
CKEDITOR.on(‘dialogDefinition’, function (event) {
    var editor = event.editor;
    var dialogDefinition = event.data.definition;
   // var dialogName = event.data.name;
    var dialogName = “image”;
    var tabCount = dialogDefinition.contents.length;
    for (var i = 0; i < tabCount; i++) { //цикл для замены клика всех кнопок “Посмотреть на сервере”
        var browseButton = dialogDefinition.contents[i].get(‘browse’);
        if (browseButton !== null) {
            browseButton.hidden = false;
            browseButton.onClick = function (dialog, i) {
                $(‘<div id=”elfinderz” \>’).dialog({
                    modal: true,
                    width: “70%”,
                    title: ‘Togally Assets’,
                    dialogClass: “elfinderz-filez”,
                    zIndex: 9999999,
                    create: function (event, ui) {
                        $(this).elfinder({
                            resizable: false,
                            lang: ‘en’,
                            url: base_url + ‘assets/js/plugins/elfinder/php/connector.php?mode=’ + dialogName,
                            getFileCallback: function (url) {
                                var dialog = CKEDITOR.dialog.getCurrent();
                                if (dialog._.name == “image”) {
                                    var urlObj = ‘txtUrl’
                                } else if (dialog._.name == “flash”) {
                                    var urlObj = ‘src’
                                } else if (dialog._.name == “link”) {
                                    var urlObj = ‘url’
                                } else {
                                    return false
                                };
                                dialog.setValueOf(dialog._.currentTabId, urlObj, url);
                                $(‘a.ui-dialog-titlebar-close[role=”button”]’).click();
                return false;
                            }
                        }).elfinder(‘instance’)
                    }
                })
            }
        }
    }
});
// initializing elfinder
$( ‘textarea.editor-ck’ ).ckeditor({height:”500px”})
});
</script>
Resource
=============
// for stand alone purpose with out ckeditor ( in elfinder/elfinder.html )

<script type=”text/javascript” charset=”utf-8″>
// Helper function to get parameters from the query string.
function getUrlParam(paramName) {
var reParam = new RegExp(‘(?:[\?&]|&amp;)’ + paramName + ‘=([^&]+)’, ‘i’) ;
var match = window.location.search.match(reParam) ;

return (match && match.length > 1) ? match[1] : ” ;
}
$().ready(function() {
var funcNum = getUrlParam(‘CKEditorFuncNum’);

var elf = $(‘#elfinder’).elfinder({
url : “http://192.168.123.10/togally-dev/assets/js/plugins/elfinder/php/connector.php&#8221;,
getFileCallback : function(file) {
window.opener.CKEDITOR.tools.callFunction(funcNum, file);
window.close();
},
resizable: false
})
});
</script>

laravel, php

changing mac’s default php setting to xamp [ enabling mcrypt in mac lion]


To those that uses XAMPP 1.7.3 and Mac

  1. Go to Terminal
  2. Enter which php
    • If it says /usr/bin/php, then proceed to 3.
  3. Enter sudo nano ~/.bash_profile
  4. then paste this export PATH="/Applications/XAMPP/xamppfiles/bin:$PATH"
  5. ctrl – O then enter to save, then ctrl – X to exit.
  6. restart terminal.
  7. Enter which php
    • If you did it right, it should be the same as the path in #4.

The reason for the mcrypt error is because your mac uses it’s native php, you need to change it to the one xampp has.

Some of useful commands to test php settings in mac lion

>> which PHP  // to see if mac is using default php server or third party php setting [ xamp or mamp ]

>> php –version  // to see the php version

>> php -m  // to see the active modules / extensions


Reference : http://stackoverflow.com/questions/16830405/laravel-requires-the-mcrypt-php-extension


ajax, JavaScript, jquery

live updating select option with chosen


If you guys have ever used chosen plugin. you might have end up trying dynamically changing selection option with javascript.
Here is code below, that you can update option dynamically with javascript for chosen plugin.


<select name="names" id="names" >
    <option value="1"> Niraj </option>
    <option value="2" >Buddha</option>
    <option value="3">Dino</option>
    <option value="4">AL</option>
</select>

$("#name").chosen();

// updating again with javascript
document.getElementById('names').value = 4;
$('#names').trigger('liszt:updated');
CSS 3, Design Inspiration, JavaScript, jquery

Basic jquery plugin developement / css3 round image


Note:

-----------------------------------------

1. Just a quick plugin development, to fix my work. You may extend it use it distribute it and what ever....................

Objective of the post

--------------------------------------

1. Basic Plugin development

2. implementing css3 round image style

-------------------------------------------------

<script src="https://ajax.googleapis.com/ajax/libs/jquery/1.9.1/jquery.min.js"></script>
<script>

// plugin start from here

// this hooks a new function to jquery [ $.fn.circle_me = function ]

/*

plugin name : circle_me

author : Jumper

email : neerooze@gmail.com

*/
$.fn.circle_me = function(options) {
console.log('Init circle me');

// default styles

var _style = {
             border: '1px solid #DDD',
             borderRadius: '50%',
             display: 'inline-block',
             height:"200px",
             width:"200px"
};
// over ridding the default style with users style
_style = $.extend( _style, options);

/*
Here   "  return "  is so important if you want to add changeable function.

eg:         $(".circle_now").circle_me().hide();

if you do not add return, here hide function will not work but still plugin will work  fine. If you do not want to add chain function you may ignore return function.

*/
return $(this).each(function(){
              $(this).css(_style);
              var _bg = $(this).attr('src');
              $(this).css({"backgroundImage":_bg});
        });

}

// plugin ends here
$(document).ready(function(){

     // initializing plugin basic

     $('.circle').circle_me();

    // initializing plugin with custom options

     $('.circle').circle_me( {  height: "300px", width: "400px", borderRadius:" 70%"});
});
</script>

// html part

<img class="circle"  src="https://fbcdn-sphotos-a-a.akamaihd.net/hphotos-ak-ash3/67563_10151525052674927_2120163905_n.jpg" />

DEMO
Cheers..